Saturday, 27 June 2015

WHICH TYPE OF EYESHADOW?


Powder eyeshadows have been used for generations, but cream and crayon eyeshadows are now being made by more and more brands, so it can be hard to decide which to choose. Here we discuss some of the pros and cons of each type.


POWDER EYESHADOW
If you have oily skin it is best to stick to the eyeshadow which is drier and less likely to crease on your skin. Dry eyeshadows also give a natural, soft finish and are easy to build colour with if using more than one eyeshadow. Dry eyeshadows are easy to apply and can have a matte or pearl finish. Colour can be built up from natural to full coverage very easily. Powder eyeshadows can also be cost effective because they often come in duos, trios or quads in which the colours complement each other.

CREAM EYESHADOW
Some people prefer cream eyeshadows for their shimmery texture and because they are generally longer wearing than their powder counterparts. Other people think they crease more easily than powders. Irecommend Estee Lauder's long wear Double Wear Cream Eyeshadows which have exceptional staying power and look fantastic in matte to demi-pearl finishes. Two colours can easily be blended together with cream eyeshadows. Cream shadows are moist on application but dry to leave either a matt powder or shiny reflective look.

STICKS AND CRAYON EYESHADOW
Eyeshadow crayons offer vibrant, light to full coverage colour. They work as shadows or liners as well as full colour eyeshadows. They are also easy to apply because you don't need an applicator.

LOOSE POWDER EYESHADOW
Often shimmery or glittery, loose powder eyeshadows are easy to apply and long lasting, they can also be used for subtle or intense colour. They contain ingredients to help them adhere to the skin which can be ideal for oily skin types. They give a great look for a night out. You can also
use an eyeshadow base to help your loose powder stay in place.

MATTE VERSUS METALLIC TEXTURES
Matte eyeshadows usually come in powder form. Matte shades can create more depth and definition than metallics as they absorb the light. Matte shades are the perfect day time eyeshadows as they can look softer and more natural than shimmery metallics. Two or more matte shades complement each other and can easily be blended together. All eyeshadow types can come in metallic colours. Metallics reflect the light and can be used as highlighters. Metallics are ideal for an evening look. Often ome metallic colour is enough to achieve a stunning look.


MAKING YOUR EYESHADOW LAST LONGER
There are a number of ways to make your eyeshadow last longer. Firstly you could apply some loose or pressed powder to your eyelids before application to help set the eyeshadow (this works particularly well for powder and cream eyeshadows). Some brands sell special cream
makeup bases which can be used to set all types of eyeshadow, such as Estee Lauder Double Wear Stay-in Place Eyeshadow Base. Another way to make your eyeshadow last longer is to layer it by applying a cream or crayon eyeshadow underneath a powder eyeshadow.

Friday, 26 June 2015

DAY TO NIGHT MAKEUP!


Here is an example of how to turn your daytime makeup into evening wear...

EYESHADOW
Following the application instructions in our how to apply eyeshadow perfectly article , it is popular to wear two eyeshadow colours in the daytime – a light and a medium shade – and then add the third darker shade in the evening.

EYELINER
In the daytime you would apply your eyeliner in the following way: Make sure the pencil is sharpened, smudge it on the back of your hand to make sure it is soft enough to apply.

UPPER LID
Starting from the outer corner, draw a line (as close to lash line as possible) to the centre of the eyelid. Smudge the colour with the eyeliner's sponge.

LOWER LID
Starting from the outer corner, draw a line (as close to lash line as possible) to the centre of your lower lid. Smudge the colour with the eyeliner's sponge. In the evening simply extend the eyeliner's line (on both the upper and lower lid) to the inner corner of the eye. This makes the line more noticeable giving a more dramatic look. Again smudge the colour for a softer line.

MASCARA
In the daytime you would just want one or two coats of mascara on both the lower and upper eyelashes. For an evening look you can add more coats to your lashes to build up the length and volume, and to darken the colour.

LIPS
Well lips are the easiest bit! You certainly shouldn't stick to those natural nudes at night. Just have confidence and reach for that bolder, brighter shade, whether siren red, fushia pink, passionate plum or shimmering copper. You can also add a gloss for a high shine, more dramatic and noticeable finish.

HOW TO APPLY EYESHADOW PERFECTLY


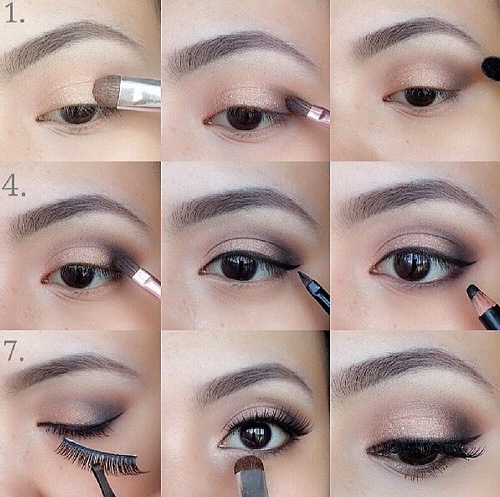
Eyeshadow can add colour and definition to your eyes and many gorgeous looks can be achieved if using the right colours and techniques. One of the biggest dilemmas for many women is knowing how many eyeshadows to use, and when more are needed. Here is our rough guide to how to use eyeshadows for an everyday look.

SINGLE
One colour, often neutral, can be used to even out skin tone and create a base on the eyelids in preparation for more colours. One colour can also be used to brighten the eyes. This may be a cream, beige or soft pink shade. If you wear eyeliner, you may not wish to wear more than one subtle eyeshadow colour to keep the look more natural. Some women choose to wear a bolder, brighter colour such as purple to complement clothing or for a more dramatic look. One colour is easy to apply with a flat, rounded eyeshadow brush.

DUO
Two colours can be worn for extra definition and to create a fuller, more rounded eye shape. Beige and brown; light blue and dark blue; silver and charcoal; light pink and dark pink, are just some of the colours which work well together.

STEP 1
Apply the lightest colour all over the eyelids using a flat, rounded eyeshadow brush.

STEP 2
Using an angled eyeshadow brush work the darkest colour from the far outer corner of your eyelids around the crease of your eyelid to about midway, forming a V shape.

STEP 3
Using a large, flat blending brush, blend the two colours together and soften the eyeshadow where the two colours meet. Finish the look with your choice of eyeliner and mascara.

TRIO
Three colours can be used to add greater colour, depth and definition to a look. Usually you will use a light, medium and dark colour. For example, this could be cream, beige and brown; silver, grey and charcoal; silver, light blue and navy; beige, gold and bronze; or white, pink and plum.

STEP 1
Apply the lightest colour all over the eyelids and up to the brow bone using a large flat, rounded eyeshadow brush. This is called the highlight. (Optional).

STEP 2
Apply the medium colour across the eyelid using a flat, rounded eyeshadow brush.

STEP 3
Using an angled eyeshadow brush work the darkest colour from the far outer corner of your eyelids around the crease of your eyelid to about midway, forming a V shape.

STEP 4
Using a large, flat blending eyeshadow brush blend the medium and dark colours together and soften the shadow where the two colours meet.

STEP 5
Using a small, flat, rounded eyeshadow brush and using the lightest shade, dab a vertical line in the centre of your eyelids in order to create a central highlight which will catch the light adding dimension to your colour. (Optional).
Finish the look with your choice of eyeliner and mascara. To find out how to change your eye makeup from a day to night time look, read our article .

MAKING YOUR EYESHADOW LAST LONGER
There are a number of ways to make your eyeshadow last longer. Firstly you could
apply some loose or pressed powder to your eyelids to help set your eyeshadow. Some brands sell special cream makeup bases which can be used to set all types of eyeshadow. Estee Lauder's Double Wear Stay-in Place Eyeshadow Base is particularly good and works well under
both powder and cream eyeshadows. Another way to make your eyeshadow last longer includes using a cream or crayon eyeshadow underneath a powder eyeshadow.
TYPES OF MAKEUP BRUSHES & THEIR USES


TOOLS OF TRADE

Most makeup brands sell a range of makeup brushes to compliment their makeup. Good quality makeup brushes made from high quality fibres or hair can be pricey. You can either purchase all your brushes from your favourite brand or mix and match those you prefer or to get better

value. So if you don’t know your contour blender from your smudge stick, brush up your tool knowledge with my tip top guide and brush recommendations to transform you from clueless to confident...


FOUNDATION BRUSH
Designed to achieve a smooth and flawless.        
finish, the bristles are tightly packed with a
tapered tip for fluid application. Dampen the
brush first in warm water and firmly squeeze
the excess into a towel or tissue, this will help achieve a more even distribution. You can also blend any brush strokes as you go with a damp natural or wedge sponge.
Pictured: Clinique Foundation Brush


CONCEALER/CAMOUFLAGE BRUSH
A soft bristled, flat brush with a wider base and a
pointed tip. Use to apply concealer under the eyes,
to spots and to camouflage problem areas such as broken capillaries and areas of discolouration.
Pictured: Clinique Concealer Brush


DUO FIBRE BRUSH
Made from a blend of goat and synthetic fibres
this brush is ideal for buffing and blending colour .
The flat, circular, feathery head
provides lightweight and buildable coverage of liquid,
cream or powder. Use to blend cream blush onto the apples of your cheeks or for a light dusting of shimmer powder to your cheek and brow bones. Pictured: MAC Due Fiber Face Brush


BRONZER/POWDER BRUSH
Soft, full and rounded, this brush can be used for
both compact powder and bronzer. The bristles pick
up the perfect amount of colour and distribute
flawlessly onto the skin. Load your brush with the powder and shake away any excess before sweeping onto the skin. Pictured: Laura Mercier Bronzer Brush


MINERAL POWDER BRUSH
A thick bundled brush that can sometimes be
used both wet and dry. It is expertly designed
to buff mineral powder onto your skin for
pure perfection. Apply in small circular
motions for a faultless finish. Pictured:
Elizabeth Arden Mineral Makeup Brush


FAN POWDER BRUSH
Created for use with loose powder, the fine fan
sweeps a light dusting of powder onto the skin for a soft, velvety effect. Thisapplication
technique avoids heavy coverage which can
highlight fine lines and imperfections. These
brushes are also used to remove excess powder on the face, particularly after eyeshadow application

Pictured: Benefit Fantail Brush


BLUSHER BRUSH
Made with fine, gentle fibres the blusher brush has a rounded head which is perfect for giving a pop of colour to the apples of your cheeks. Sweep and blend along your cheekbone drawing the brush up into your hairline.Pictured: MAC Blush Brush


FACE CONTOUR BRUSH
Slanted and rounded in shape, the contour brush mimics the angles of your cheekbones. This is
ideal for highlighting and shading with bronzer or illuminating powder. Use with cream, gel or
powder to contour a sculpted finish for a defined and dramatic makeup. Pictured: MAC Face Contour Brush


EYE SHADOW BRUSH
Large, flat, short and brimming with bristles for excellent coverage. The soft
bristles have a bevelled edge for a smooth application without ‘dragging’ the eyelid. Use to apply
all over colour. Pictured: Bobbi Brown Eyeshadow Brush


ANGLE EYE SHADOW BRUSH
A long, round and tapered brush perfect for shading the eye socket. Just gently follow the
natural crease of the socket blending back and forth to build up depth of colour. Pictured: Laura
Mercier Angled Eye Colour Brush


BLENDING EYE SHADOW BRUSH
Use this light brush to blend eye colours and to highlight the brow bone. Pictured: Estee Lauder
Blending Shadow Brush


FINE POINT EYELINER BRUSH
The extra fine tip of this brush delivers precise liquid and gel eyeliner application. A
perfect line can be achieved in one stroke, or use the point to dot in between lashes for
a more subtle effect. Pictured: Laura Mercier Fine Point Eyeliner Brush


FLAT EYELINER BRUSH
Allows eyeliner to be applied deep into the lash line for a richer and more distinct eye.
Gently brush upwards to soften and blend the line for a smokey eye. Pictured: Benefit Hard Angle Brush


SMUDGER BRUSH
You’re most likely to find these doubled ended with an eye pencil. The foam tip is used to
soften the harsh line of the pencil giving a smouldering finish. Larger ones can also be
used for applying eyeshadow such as The Body Shop's Smudger Brush.


SLANTED EYEBROW DEFINER BRUSH
Used to define and fill brows for a beautifully symmetrical appearance. The bristles are stiff
and angled for precise control. Apply powder, liquid or cream in short strokes mimicking the hairs, fill sparse areas, shape and elongate for a perfect brow. Pictured: Bobbi Brown Eyebrow Brush


SPIRAL EYEBROW BRUSH
Ideal for taming unruly hairs, the stiff bristles smooth and comb eyebrows into form. When
shaping, use to brush hairs upwards and trim the excess for neatly groomed brows. Pictured: Tweezerman for Benefit Brow Shaping Brush


LIP BRUSH
The sculpted tip of a lip brush is perfect for achieving a flawless line. The bristles are
short and firm for controlled application. Pictured: Laura Mercier Lip Colour Brush


CLEANING MAKEUP BRUSHES
Finally, don't forget your brush cleaner! You don't want to spend a lot of money buying high quality makeup brushes if you are not going to be able to look after them by
keeping them clean and conditioned. Foundation, eyeshadow and lip brushes should be cleansed after each use to stop bacteria spreading and therefore keep your
skin clear; whilst other types of brushes such as powder and blusher can be cleansed once a week. Most brands that sell brushes also have a brush cleanser.


COMPLETE MAKEUP BRUSH SET
Need a complete makeup brush starter set including all brush types mentioned in this article?


Wednesday, 17 December 2014

What You Need To Know About Your EyeBrows...

   Tips on growing,filling in and shaping your brows


We've all been through the traumatizing experience of realizing we've over plucked or running into an ex just after waxing(red forehead and all),So it should come as no suprise that a few things can go wrong when it comes to eyebrow maintenance. Whether you're fully embracing the bold eyebrow trend or just sticking to your bi-weekly eyebrow appointments at the salon. It's increasing essential that every girl have a handle on what is going on North of her eyelashes..
  Well,i just came away with more than a few secrets to share about eyebrows, Read on my tips on growing in,shaping and plucking your eyebrows,whether you go to a pro or pluck your brows at home.
  A perfectly filled natural looking eyebrows is the secret to a photo-ready bridal makeup. However,many Nigerians and Black Africa women over look their eyebrows and wonder why the expensive makeup didn't help them look as pretty as the photo post. This tips might help you through the step by step proces.  to use eye pencils or your eyebrow powder or gel to draw and fill your eyebrows to look clean and natural even if you have a scanty brows or mistakenly shaved off every brow hair...

Brow Shapening/Definition
 A properly shaped eyebrow enhances beauty and draws more attention to your face.
* Never line your eyebrows with a black pencil.Always use a brown pencil or something lighter than your natural colour or darker than the hair and not a blur pencil.
* Highlight the brows and DO NOT draw thick brows.

We can define the brows in different ways
-Shaping off with a razor blade
-Waxing off your brows and
-Plucking off with a Tweezer
Either shaping,waxing or plucking; Start with a face mapping,consider the type of brow you want,brush the brows up and down to trim off excess hairs and finally adjust to the shape you want or desire.

*Secret to Shaping
 Follow the bone structure which is the secret to my success. First,when you trim,you need to be conservative. It's always better to need to do more than overdo it. When in doubt,don't pluck it out. Also,follow nature,your arch should be where your brow bones protudes the most. Then work in straight lines,from under the brow up to the arch should be a straight line,then from the arch should be a straight too. There shouldn't be any curvature like a 'c' or 's' curve. Follow the same rule when filling in yor brows whether using pencil,gel or powder. Work in straight lines and always remember to brush the product throught your brows so that it's blended and you won't look like you have drawn on brows

*Why plucking is the best
-waxing is for cars and you should dread the thread. Honestly,plucking has the most precision. You're far less likely to make mistake. When i first started doing brows,i could have chosen any method i wanted,i thought waxing would be fast but it does not have much precision. Tweezers are really the BEST.


*Eyebrow Growth
 For growing in your brows,there are few things to keep in mind,it will work if you have had hair there (as in,it won't make random areas on your face grow hair), and let's say you had a bad brow shaping or got carried away. It won't work on someone who is very elderly or if you were waxing for 20 years and decided not to grow it in,if that follicle is dead and it's been dead. When it also does is coat the hair so it makes your brow look thicker and fuller. I know it works because my brows grow really fast,so when i was testing out the formular i was putting it on my eyelashes at night...lol and people started asking me if i was wearing mascara. It realky gives you a fresh start. Try Biosil eyebrow growth serum.


*Filling in your brows
-Shape your brows to keep the stray hair away
-Define the brow shape you want using a eyepencil,draw a line on top of the brow and below the brow
-Fill in the brow to create an illusion of real hairs,use a dark brown eyepencil and fill hair-like strokes in the direction of the hair growth. Use shortlight feathery strokes(one stroke at a time,not long strong lines),while along your natural brow shape and arch. This would make sparse or thin brows appear fuller while adding definition to the brows. In place of eye pencil,you can also use  eye shadow (matte) or brow powder using an angled brush.
-Brush it out and repeat. Use a spoolie brush or an old mascara brush to brush out the eye pencil. This will spread out the color pigment and make the brow filling look even lighter and more natural,continue brushing out with the spoolie brush until the brows are in the shape you desire.
-Clean up the edges. Take some concealer in a small flat brush  and apply under the brows to clean up around the edges where you drew the eyepencil  and remove the colors where they spilled,this will give a clean professional definition to your brow bones and also highlight the brow top.


Eyebrows should be CLASSIC
 Now,the bold brows is in,which i'm very happy about,because i don't think thin brows look good on anyone no more. When it came back for a nanosecond in the '90's , even the super models looked awful with a pencil thin brow.
Makeup can be trendy,but eyebrows should be classic. You want to look at a picture of yourself in 20 years and say WOW,Beautiful.... You should not look at a picture and think about what the eyebrow trend was at that time. Really great beauties like EVA Alordiah (my role model)
 :-) ,Toke Makinwa and Munachii,any pictures of them that you look at,they're classic beauties. They could walk into the room today and they would look great with their eyebrows

 I really hope you guys enjoyed my tips and secrets on Eyebrows
Y'all could catch me on Twitter and InstaGram @ mz_lymarh..Love ya loads

If you like reading this post,please kindly state your views by making comments below....

Monday, 15 December 2014

When Was Your Last HairCut???


When was your last trip to the salon? If it took you more than 30 seconds to answer that question…it’s been too long! Many do not know the importance of regular visits to the salon, in fact to most, getting a haircut is less than essential; however the best way to keep your hair looking healthy, thick, and alive is by getting regular trims and cuts.

These days, with all of the styling, dying, and damage that is done to the hair, getting scheduled hair cuts can keep the hair from suffering from dry and split ends. If you want your hair to grow, getting it cut is the best way to do it! Although it may seem counterintuitive, stylists swear by it, and ridding your head of all the dead ends actually promotes growth in the long run!
Keep your confidence up, and your hair looking fabulous month after month with the help and talent of our amazing stylists....


Tuesday, 7 October 2014

Top 5 Make-Up Must Have

See  what I consider a must have in your daily makeup bag whether you are a
beginner,professional or just a lover of MakeUp:

1.Brushes- Every lady using make-up should have good set of brushes. You can never
go wrong when you apply make-up correctly with brushes. A lot of ladies i've worked with
complain a lot about not acheiving better results with their foundations and shadows,
The truth is even when they have been color matched correctly,they still don't acheive
flawless results.
 My favourite brushes are from MAC brush set (N6000), you could also try sigma brush set


2.Primers-One secrets professional make-up artiste pride themselves in. This
acts as a base for all make-up products,allows skin to look flawless and banishes
shine. It alsi minimizes pores. We have foundation primers,eye primers and lip
primers
 I use the Avon MagiX face perfector SPF 20- costs N2000


3.Mascara-It thickens as it gets exposed to air over time,so make sure u get
 a clump free mascara. Try different brands,mascara are used to lengthen
your lashes especially if you can't get lash extensions on. The Trick is to
wiggle your mascara wand and pull from the bottom of your lash working your
way to the top.
 Good mascara should be MAC plush lash(N2,500)...You won't even think
  about smudges,clumps and flakes


4.Brow pencils-Having a neatly groomed/tweezed eyebrows would
 not only frame your face. It would help make your eyes pop. Fill
in your brows carefully along the natural brow hairs to create an
illusion of a fuller or more defined brows. Pencil colors choices
would range from light brown to very dark brown depending on
your skin tone.Just take your time to get it right and you eill...

5.Foundations and Concealers-One of the basic things to do to
 make your face appear effortlessly is to apply your foundation
and concealer in perfect lines. For foundation,if you want a full coverage,you
use your powder brush and dust some on your face really quick
before work. It gives the skin a great glow in my opinion and
prevent it from looking masky. For concealers,it prevents dark
circles and create highlights.it also doesn't crease like some
brands..
 Try Iman Second to None Luminous Foundation(N3,500)
 and Milani secret cover concealer cream which costs
 N1,500.


 Hope you enjoyed this?  Let me know your thoughts and what products you
 swear by,lol! Tweet at me @Mz_lymarh and let's get talking..

If you liked  reading this post,state your views by commenting below.